Why You’ll Love This Recipe
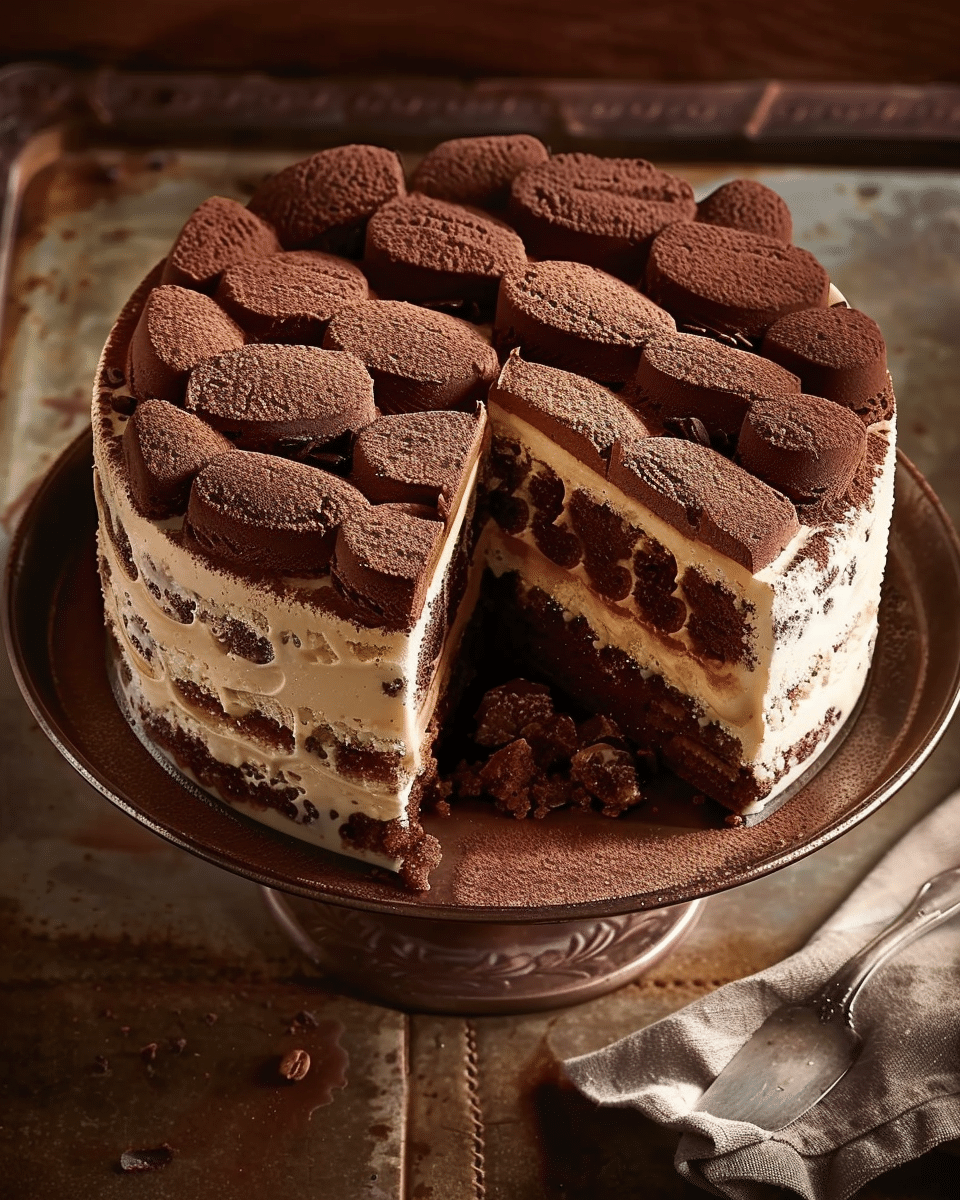
This Tiramisu Ice-Cream Layer Cake is a game-changer for tiramisu fans. It’s got all the familiar flavors—coffee, cocoa, and creamy layers—while being served as a cool, frozen treat. The sponge finger biscuits soak up the coffee liqueur and espresso, adding just the right amount of richness and flavor. The combination of vanilla and coffee ice cream makes it indulgent yet refreshing. Plus, it’s a no-bake dessert that’s perfect for hot days or when you need something to impress your guests with minimal effort.
Ingredients
- 500ml store-bought vanilla ice cream, softened
- ¼ cup (60ml) coffee-flavored liqueur
- ¼ cup (60ml) strong espresso coffee, cooled
- 12 sponge finger biscuits (ladyfingers)
- 500ml store-bought coffee ice cream, softened
- Dutch cocoa, for dusting
(Tip: You’ll find the full list of ingredients and measurements in the recipe card below.)
Directions
- Prepare the Sponge Fingers:
- In a shallow dish, combine the coffee-flavored liqueur and cooled espresso coffee. Dip each sponge finger biscuit into the coffee mixture for just a couple of seconds, ensuring they’re soaked but not soggy.
- Arrange the soaked sponge fingers in the bottom of a round cake pan (9-inch) to form the base layer. You may need to trim a few to fit snugly.
- Layer the Vanilla Ice Cream:
- Once the sponge fingers are arranged, spread the softened vanilla ice cream over the top in an even layer, smoothing it out with a spatula.
- Place the pan in the freezer and let it freeze for about 30 minutes to firm up the vanilla ice cream layer.
- Layer the Coffee Ice Cream:
- After the vanilla ice cream has set, spread the softened coffee ice cream evenly over the vanilla ice cream layer.
- Add another layer of soaked sponge fingers on top of the coffee ice cream, pressing them gently into the ice cream.
- Freeze the Cake:
- Once all the layers are assembled, cover the cake pan with plastic wrap and place the cake in the freezer for at least 4 hours, or preferably overnight, to allow it to firm up completely.
- Dust with Cocoa:
- Once the cake is fully frozen and ready to serve, dust the top of the cake with Dutch cocoa powder using a fine mesh sieve for an elegant finish.
- Serve:
- To serve, let the cake sit at room temperature for 5-10 minutes to soften slightly before slicing. Enjoy the creamy, coffee-flavored layers!
Servings and Timing
- Servings: This recipe makes about 8 servings.
- Prep Time: 20 minutes
- Freezing Time: 4 hours (or overnight)
- Total Time: 4 hours 20 minutes (or overnight)
Variations
- Add Chocolate Shavings: For an extra indulgent touch, top the cake with chocolate shavings or mini chocolate chips before freezing.
- Layered Chocolate Ice Cream: If you prefer, you can swap the vanilla ice cream with chocolate ice cream for a different flavor profile.
- Alcohol-Free Version: If you prefer an alcohol-free version, simply omit the coffee-flavored liqueur and add an extra shot of espresso to the coffee mixture.
- Liqueur Substitution: You can experiment with other liqueurs such as Baileys Irish Cream or Kahlúa for a twist on the classic.
Storage/Reheating
- Storage: Store the Tiramisu Ice-Cream Layer Cake in the freezer, tightly covered with plastic wrap or foil, for up to 1 week.
- Reheating: This cake is best served frozen, so no reheating is necessary. Just let it sit at room temperature for a few minutes before slicing to allow it to soften slightly.
FAQs
Can I use homemade ice cream instead of store-bought?
Yes, you can use homemade ice cream if you prefer. Just make sure the ice cream is softened before layering.
How do I prevent the sponge fingers from becoming too soggy?
Dip the sponge fingers in the coffee mixture briefly—just a few seconds—to avoid them becoming too soggy. You want them to be moist but still hold their shape.
Can I make this cake in advance?
Absolutely! This dessert is great for making ahead. Just make sure to let it freeze completely overnight before serving.
Can I make this cake without the coffee liqueur?
Yes, you can make this cake without the coffee liqueur. Just use more cooled espresso coffee, or add a splash of flavored syrup like caramel or hazelnut for a different twist.
How do I store leftovers?
Store any leftover cake in the freezer, tightly wrapped, for up to 1 week. Let it sit for a few minutes at room temperature before serving.
Can I make a different flavor combination?
Certainly! You can experiment with different flavors of ice cream, such as hazelnut, chocolate, or even tiramisu-flavored ice cream, to change up the taste.
Can I make this cake in a different size pan?
Yes, you can use a smaller or larger pan, but you may need to adjust the amount of ice cream and sponge fingers to fit the new size.
How can I make sure the cake slices well?
Allow the cake to sit at room temperature for 5-10 minutes before slicing. This will make it easier to cut through the layers without cracking.
Can I add a layer of whipped cream?
Absolutely! You can add a layer of freshly whipped cream on top of the coffee ice cream layer for extra richness.
Conclusion
Tiramisu Ice-Cream Layer Cake is a delicious twist on a classic dessert, combining the creamy richness of ice cream with the bold flavors of coffee and tiramisu. It’s the perfect treat for any occasion—whether you’re hosting a summer party, a holiday gathering, or simply enjoying a sweet indulgence at home. With its layers of flavor and creamy texture, this dessert will quickly become a favorite in your recipe collection! Enjoy every decadent bite!
Print
Tiramisu Ice-Cream Layer Cake
- Total Time: 4 hours 20 minutes (or overnight)
- Yield: 8 servings
- Diet: Vegetarian
Description
This Tiramisu Ice-Cream Layer Cake combines the rich flavors of traditional tiramisu with the creamy goodness of ice cream. With coffee-soaked sponge fingers, vanilla and coffee ice cream layers, and a dusting of cocoa, this no-bake dessert is perfect for summer or any special occasion.
Ingredients
For the Cake:
500ml store-bought vanilla ice cream, softened
¼ cup (60ml) coffee-flavored liqueur
¼ cup (60ml) strong espresso coffee, cooled
12 sponge finger biscuits (ladyfingers)
500ml store-bought coffee ice cream, softened
Dutch cocoa, for dusting
Instructions
Prepare the Sponge Fingers:
-
In a shallow dish, combine the coffee-flavored liqueur and cooled espresso coffee. Briefly dip each sponge finger biscuit into the coffee mixture for a couple of seconds, ensuring they’re soaked but not soggy.
-
Arrange the soaked sponge fingers in the bottom of a 9-inch round cake pan to form the base layer. Trim the biscuits as necessary to fit.
Layer the Vanilla Ice Cream:
-
Spread the softened vanilla ice cream evenly over the soaked sponge fingers, smoothing it out with a spatula.
-
Place the pan in the freezer for 30 minutes to firm up the vanilla ice cream layer.
Layer the Coffee Ice Cream:
-
After the vanilla ice cream has set, spread the softened coffee ice cream evenly over the vanilla layer.
-
Add another layer of soaked sponge fingers on top of the coffee ice cream, gently pressing them into the ice cream.
Freeze the Cake:
-
Cover the cake pan with plastic wrap and place the cake in the freezer for at least 4 hours, or preferably overnight, to allow it to firm up completely.
Dust with Cocoa:
-
Once the cake is fully frozen, dust the top with Dutch cocoa powder using a fine mesh sieve for an elegant finish.
Serve:
-
Let the cake sit at room temperature for 5-10 minutes before slicing. Serve and enjoy the creamy, coffee-flavored layers!
Notes
Variations:
Add Chocolate Shavings: For an extra indulgent touch, top the cake with chocolate shavings or mini chocolate chips before freezing.
Layered Chocolate Ice Cream: Swap the vanilla ice cream with chocolate ice cream for a different flavor profile.
Liqueur Substitution: Try Baileys Irish Cream or Kahlúa for a twist on the classic.
Storage: Store the Tiramisu Ice-Cream Layer Cake in the freezer, tightly covered with plastic wrap or foil, for up to 1 week.
Reheating: This cake is best served frozen, so no reheating is necessary. Let it sit at room temperature for a few minutes before slicing to allow it to soften slightly.
- Prep Time: 20 minutes
- Category: Dessert, Cake
- Method: No-bake, Freezing
- Cuisine: Italian-inspired


